Unleash the Magic of Colour Detection with OpenCV in HSV Color Space

Do you remember those captivating scenes from your favourite spy movies where secret agents analyze a hidden message or track a top-secret object by its unique colour code? Well, guess what? You can create your very own colour detection magic using OpenCV and the HSV (Hue, Saturation, Value) colour space! Don your imaginary spy hat, and let's dive into the world of colour detection in a fun and hands-on way.
The Art of Color Detection
Colour detection is the process of identifying and isolating specific colours within an image or video feed. It's a fundamental concept in computer vision and image processing, and it has countless real-world applications.
In this beginner-friendly project, we'll use Python and OpenCV to create a program that can recognize and highlight particular colors in real-time using your webcam or camera.
What is the HSV Color Space?
Before we embark on our adventure, let's understand the star of the show—the HSV colour space.
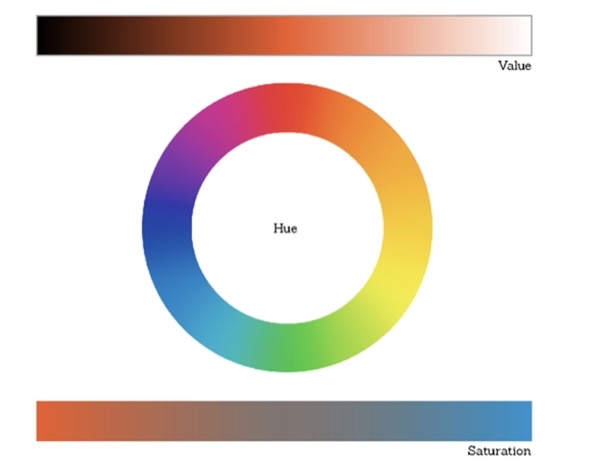
HSV stands for Hue, Saturation, and Value. Unlike the commonly known RGB colour space, where colours are represented by their red, green, and blue components, HSV separates the colour information into three key components:
- Hue (H): This represents the colour itself, such as red, blue, or green, and is measured in degrees on a circular scale.
- Saturation (S): Saturation defines the intensity or vividness of the colour. A saturation of 0 means grayscale, while higher values represent more vivid colours.
- Value (V): Value controls the brightness of the colour. A higher value results in a brighter colour, while a lower value makes it darker.
The beauty of HSV is that it makes it easier for us to detect and manipulate colours, making it the perfect choice for our project. To embark on your colour detection journey, you'll need a few tools:
- Python: You should have Python 3.x installed on your computer.
- OpenCV (cv2): This is a powerful open-source computer vision library for Python. You can install it using pip install opencv-python.
- NumPy: NumPy is a fundamental package for scientific computing with Python. You can install it with pip install numpy.
- Webcam or Camera: To see the magic in action, you'll need a webcam or a camera connected to your computer.
The Colour Detection Process
Our colour detection program follows these steps:
Capture Video: We start by capturing live video from your webcam or camera. For this, we need to
import cv2 #and create a VideoCapture object.
cap= cv2.VideoCapture(0)
ret, frame= cap.read()
Its argument can be either the device index or the name of a video file. A device index is just the number to specify which camera. Normally one camera will be connected (as in my case). So I simply pass 0 (or -1). You can select the second camera by passing 1 and so on. After this, you can capture frame by frame. cap. read() returns a bool (True/False). If the frame is read correctly, it will be True.
Convert to HSV: Each frame from the video feed is converted from the RGB colour space to the HSV colour space using OpenCV's cv2.cvtColor() function.
hsvImage= cv2.cvtColor(frame, cv2.COLOR_BGR2HSV)
Define Color Bounds: We define the lower and upper HSV colour bounds for the specific colour we want to detect. For instance, if we're interested in detecting red, we specify the range of red hues. For that we have defined a function called get-limits:
def get_limits(color):
c= np.uint8([[color]]) #here insert the BGR values which we want to convert to HSV)
Here, we create a NumPy array c that represents a single pixel colour in BGR (Blue, Green, Red) format. The colour argument should be a list or tuple containing the BGR values you want to convert to HSV (Hue, Saturation, Value) format.
hsvC= cv2.cvtColor(c, cv2.COLOR_BGR2HSV)
This line converts the c array from BGR colour space to HSV colour space using OpenCV's cv2.cvtColor() function. It's important to note that c contains a single pixel's colour in BGR, and hsvC will contain the equivalent colour in HSV.
lowerLimit= hsvC[0][0][0]-10,100,100
upperLimit= hsvC[0][0][0]+10,255,255
The hsvC array now contains the HSV values of the colour, and we are modifying the Hue component (hsvC[0][0][0]) by subtracting 10 to get the lower limit and adding 10 to get the upper limit. This effectively defines a range of colours around the original colour.
lowerLimit= np.array(lowerLimit, dtype=np.uint8)
upperLimit=np.array(upperLimit, dtype=np.uint8)
return lowerLimit,upperLimit
lowerLimit represents the lower bounds of the HSV colour range, and it's calculated by reducing the Hue component by 10 (to the left on the colour wheel). The 100, 100 values represent moderate saturation and brightness.
upperLimit represents the upper bounds of the HSV colour range, and it's calculated by increasing the Hue component by 10 (to the right on the colour wheel). The 255, 255 values represent maximum saturation and brightness.
Next line convert the lower and upper limit values into NumPy arrays with the data type uint8 (unsigned 8-bit integer). This conversion is required because OpenCV expects these values to be in this data type for colour range filtering.
Create a Mask: A mask is created using cv2.inRange() to isolate the pixels within the specified colour range.
mask=cv2.inRange(hsvImage,lowerLimit, upperLimit )
Find Contours: We identify contours in the mask—areas with connected pixels of the detected colour.
In this binary mask, pixels of interest (e.g., pixels with the target colour) are set to white (usually represented as 255), while other pixels are set to black (usually 0). The mask array is essentially a two-dimensional grid of pixel values.
mask_= Image.fromarray(mask)
Draw Bounding Boxes: Bounding boxes are drawn around the detected colour areas to highlight them.
bbox= mask_.getbbox()
if bbox is not None:
x1 ,y1,x2,y2= bbox
frame=cv2.rectangle(frame,(x1,y1),(x2,y2), (255,0,0),5) #frame, coordinates, colour of box and thickness of the box
Display the Magic: The original frame with bounding boxes is displayed in real time, revealing the colour magic happening before your eyes.
cv2.imshow('frame', frame)
#Next we need to put waitkey()
waitkey() function of Python OpenCV allows users to display a window for a given millisecond or until any key is pressed.
if cv2.waitKey(1) & 0xFF== ord('q'):
break
# Release everything once the job is finished
cap.release()
cv2.destroyAllWindows()
Let's dive into some basic questions you might have as a beginner:
Q1: What is the significance of the HSV colour space in colour detection?
HSV separates colour information into three components (Hue, Saturation, and Value), making it easier to work with and detect specific colours.
Q2: How can I install OpenCV and NumPy on my computer?
You can install OpenCV with pip install opencv-python and NumPy with pip install numpy.
Q3: What colours can I detect with this program?
You can detect virtually any colour by specifying the appropriate HSV colour bounds.
Q4: Can I use a video file instead of a webcam?
Absolutely! You can modify the program to read video files instead of capturing live video.
Q5: What are some practical applications of colour detection?
Colour detection has applications in image editing, object tracking, quality control, robotics, and more.
Let's Dive In!
Are you ready to create your colour-detection magic? Open your code editor, follow the steps, and watch as your program tracks and highlights the colours you desire. Whether you're a beginner or a seasoned developer, colour detection is a fun and educational project that can lead to exciting applications in the world of computer vision and beyond.
Anyone interested please check my GitHub link.
Happy coding! 🌈🕵️♂️


Comments
Post a Comment